Unity wrapper SDK
This is the documentation for the Unity wrapper/plugin. Before integrating, read the native SDK documentation to familiarize yourself with the platform.
Unity SDK provides a thin proxy layer for integrating existing native SDKs offering location tracking and geofencing services.
See the source on GitHub here.
Scripts documentation and Demo scene overview can be found in project READMEs.
Install#
To integrate the Unity SDK, download or clone the package and include it in your Unity project:
- Copy the
Pluginsfolder (containing both Android and iOS native implementations) into theAssetsdirectory of your Unity project. - Import the
ExternalDependencyManagerfor Unity (EDM4U). It is included in the project but you can get it fromPackage Manageror from repo: It is required if you want to add and use iOS/Android dependencies directly in your project like:Android specific libraries (e.g AARs)oriOS CocoaPods - Ensure that any required permissions or settings specific to location tracking and geofencing are configured on both iOS and Android, as outlined in the native SDK documentation.
Supported Unity versions#
The SDK has been tested on Unity 2022.3.41f, and 6000.0.24f versions. However, it should work with Unity versions 2021 and above.
Integrate#
Play Integrity API#
To enable the Play Integrity API for Android, enable the Play Integrity API on the Settings page and follow the activation steps. Include the dependency in your app's build.gradle file:
Inside mainTemplate.gradle:
dependencies { implementation 'com.google.android.play:integrity:1.2.0'}Inside Dependencies.xml:
<dependencies> <androidPackages> <androidPackage spec="com.google.android.play:integrity:1.2.0"/> </androidPackages></dependencies>Use Radar.trackVerified() after setup. If you encounter ERROR_FORBIDDEN, ensure the device has the latest version of Play Services. For more details, refer to our Fraud Documentation.
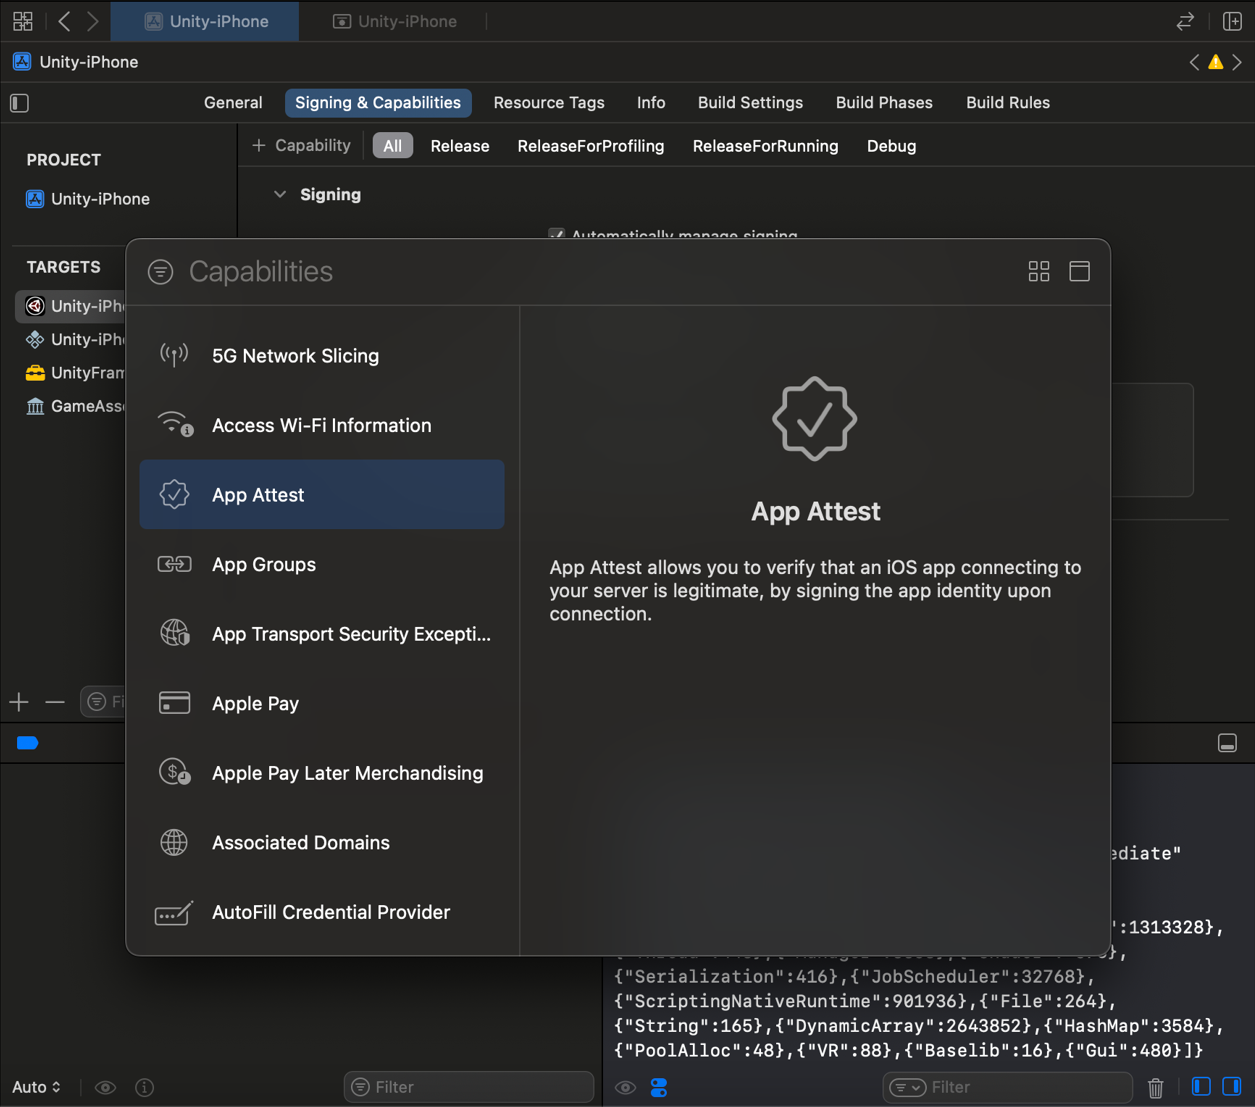
App attest#
Enable App Attest for iOS via the Settings page by listing valid App IDs. App Attest requires iOS 14 or later and must be added to your Xcode project under Signing & Capabilities. Switch to the production entitlements file for deployment.
Use Radar.trackVerified() after setup. If Radar.trackVerified() returns ERROR_FORBIDDEN, verify iOS compatibility and log details. For in-depth information, see our Fraud Documentation.

Platform-specific configuration#
Android#
To integrate with the Android SDK, make sure that `Plugins/Android` folder contains following files:
- Dependencies.xml
- gradleTemplate.properties
- mainTemplate.gradle
- sdk-debug.aar
- settingsTemplate.gradle
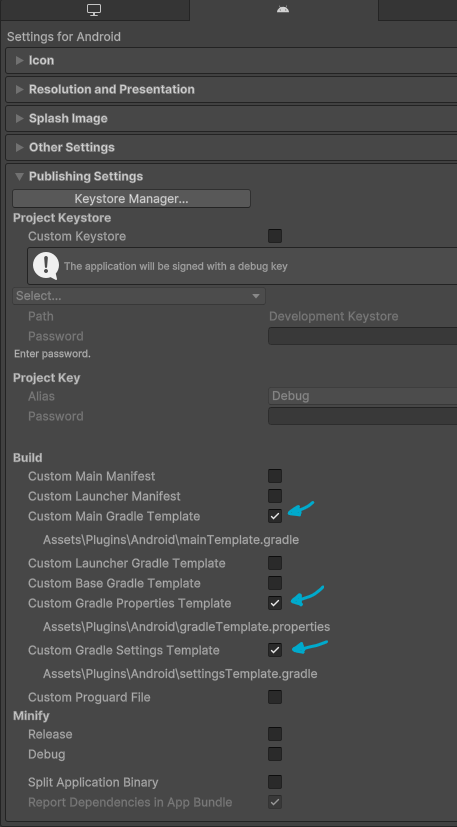
If you are missing files, make sure to include them in the `Player settings` under `Publishing Settings` section:
The content of the files should be as follows:
Dependencies.xml:
<dependencies> <androidPackages> <androidPackage spec="org.jetbrains.kotlin:kotlin-stdlib:1.6.20"/> <androidPackage spec="androidx.core:core-ktx:1.7.0"/> <androidPackage spec="androidx.activity:activity:1.2.0"/> <androidPackage spec="com.google.android.gms:play-services-location:21.0.1"/> <androidPackage spec="com.google.android.play:integrity:1.2.0"/> <androidPackage spec="io.radar:sdk:3.18.+"/> </androidPackages></dependencies>mainTemplate.gradle:
dependencies { implementation fileTree(dir: 'libs', include: ['*.jar']) implementation "org.jetbrains.kotlin:kotlin-stdlib:$kotlin_version" implementation 'com.google.android.gms:play-services-location:21.0.1' implementation 'com.google.android.play:integrity:1.2.0'}gradleTemplate.properties:
org.gradle.jvmargs=-Xmx**JVM_HEAP_SIZE**Morg.gradle.parallel=trueunityStreamingAssets=**STREAMING_ASSETS**android.useAndroidX=trueandroid.enableJetifier=trueandroid.suppressUnsupportedCompileSdk=34iOS#
To install the iOS SDK, navigate to your iOS project directory:
cd ios/In your
Podfile, ensure thatplatform :iosis set to 10.0 or higher. Then, install the required pods:pod installYou must add location usage descriptions and enable background modes in your
Info.plistfile as described in the iOS SDK documentation. This is essential for accessing location services and geofencing in the background.To handle location updates effectively, configure background processing options if your app requires tracking location changes when the app is not actively in use.
info
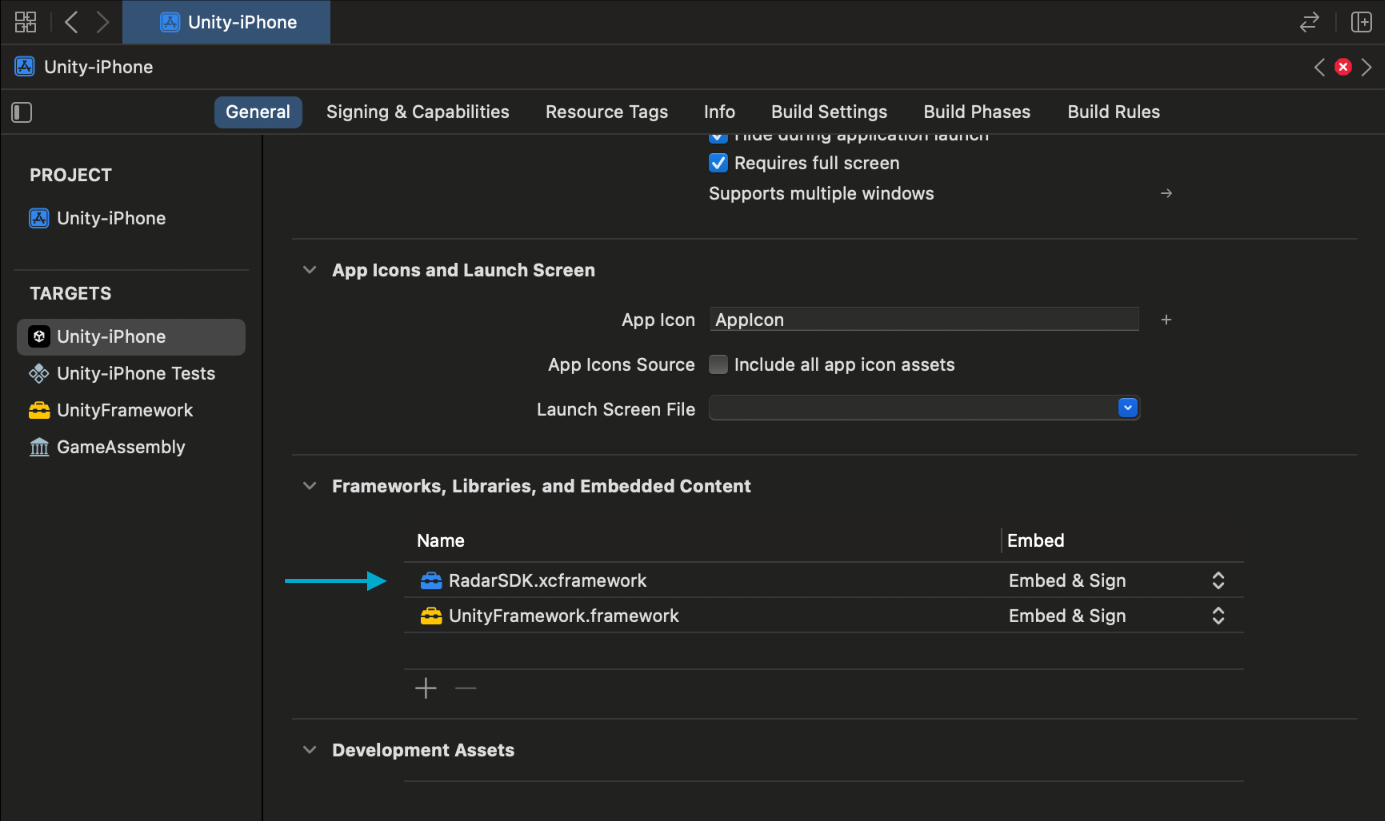
Don't forget to include RadarSDK.xcframework under Your Project General > Frameworks, Libraries, and Embedded Content when building application in Xcode.
Configuring Radar SDK settings in Unity#
The Radar SDK for Unity provides a custom editor window that allows developers to easily configure general settings, keys, and other options necessary for the Radar integration.
Accessing the settings#
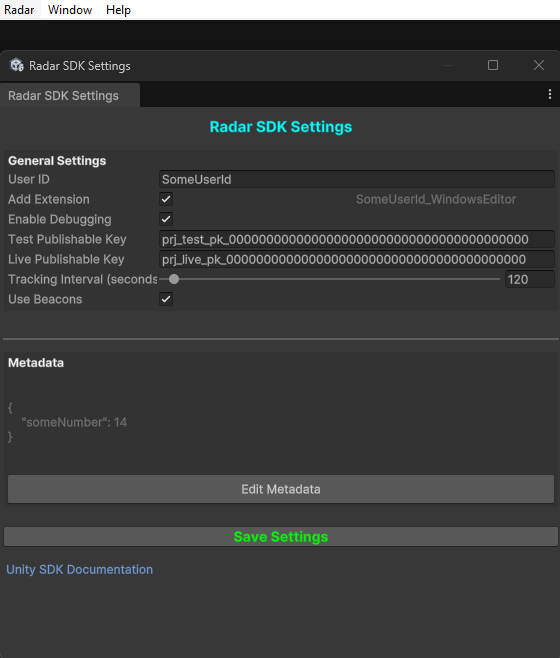
To access the Radar SDK settings, go to `Radar > Settings` in the Unity top menu. This will open the `Radar SDK Settings` window.
General settings#
User ID: Unique identifier for the user, required for tracking purposes. Defaults to
DefaultUserId. IfAdd Extensionis enabled, this ID will append platform-specific extensions (e.g.,_WindowsEditor).Add Extension: Toggle to append a platform-specific extension to the User ID.
Enable Debugging: Toggle this to enable or disable debug logging managed by
LogManagerscript.
API keys#
Test Publishable Key: Enter your project's test publishable key here. This key is used in development builds
(isDebugBuild = true).Live Publishable Key: Enter your project's live publishable key here. This key is used in release builds
(isDebugBuild = false).
You can find both publishable keys in your Radar dashboard under the project settings.
Tracking and beacons#
Tracking Interval (seconds): Sets the interval in seconds at which the location tracking updates occur.
Use Beacons: Toggle to enable or disable the use of beacons in location tracking.
Metadata#
- Metadata: A container to store or pass additional information required by the application. Click
Edit Metadatato modify the JSON-formatted data. To add/remove data, modifyMetadataContainerscript.
Saving changes#
After configuring the settings, click Save Settings to apply your changes.
Using plugin#
Once installed, access the SDK functionality using RadarSDK namespace:
using RadarSDK;Calls to APIs#
The Unity SDK exposes following APIs calls (See RadarUsageExample.cs for example usages):
Initialize#
When your app starts, initialize the SDK with your publishable API key, found on the Settings page.
private void InitializeRadar(){ string publishableKey = Debug.isDebugBuild ? RadarSDKManager.TestPublishableKey : RadarSDKManager.LivePublishableKey; Radar.Initialize(publishableKey, fraud: true);}SetUserId#
You can also assign a custom userId, also called External ID in the dashboard. To set a custom userId, call:
private void SetUserId(string userId){ Radar.SetUserId(userId);}SetMetadata#
To set a dictionary of custom metadata for the user, call:
private void SetMetadata(MetadataContainer metadata){ Radar.SetMetadata(metadata);}GetLocation#
Get a single location update without sending it to the server:
private Task<Location?> GetLocation(){   var tcs = new TaskCompletionSource<Location?>();
   Radar.GetLocation(location =>   {         if (location.coordinates != null)         {            LogManager.Instance.Log($"Location received: Latitude = {location.latitude}, Longitude = {location.longitude}", LogType.Warning);         }         else         {            LogManager.Instance.Log("Failed to get location", LogType.Error);         }   });
return tcs.Task;}TrackVerified#
Call Radar.TrackVerified() or Radar.StartTrackingVerifiedAsync() to perform fraud and jurisdiction checks.
private async Task TrackVerifiedAsync(){ await Radar.TrackVerified();}StartTrackingVerified#
Call Radar.TrackVerified() or Radar.StartTrackingVerifiedAsync() to perform fraud and jurisdiction checks.
private async Task StartTrackingVerifiedAsync(){ await Radar.StartTrackingVerified(RadarSDKManager.TrackingInterval, RadarSDKManager.UseBeacons);}StopTracking#
To stop tracking the user's location in the background (e.g., when the user logs out).
private async Task StopTrackingAsync(){ await Radar.StopTracking();}GetVerifiedLocationToken#
Instead of calling Radar.trackVerified(), which always fetches a fresh location token, you can instead call Radar.getVerifiedLocationToken(), which returns a cached location token immediately if the last location token is still valid, or fetches a fresh location token if not.
Once the native SDK retrieves the location, it sends the data back to Unity. On Android, this is done via RadarJavaProxy, and on iOS, it’s done via a delegate or callback defined in RadarUnityBridge.m
private void GetVerifiedLocationToken(){   StartCoroutine(GetVerifiedLocationTokenCoroutine());}
private IEnumerator GetVerifiedLocationTokenCoroutine(){   var task = Radar.GetVerifiedLocationToken();
   while (!task.IsCompleted)   {         yield return null;   }
if (task.IsCompleted && task.Result.Data != null) { Debug.Log($"Verified Location Token received: Status = {task.Result.Status}"); } else { Debug.LogError("Failed to retrieve verified location token."); }}OnTokenUpdated#
If you set a delegate on iOS with Radar.setVerifiedDelegate() or a receiver on Android with Radar.setVerifiedReceiver(), fresh location tokens are also delivered to OnTokenUpdated and DidTokenUpdated callbacks, respectively.
private void SetVerifiedReceiver(){   Radar.SetVerifiedReceiver(OnVerifiedLocationTokenReceived);}
private void OnVerifiedLocationTokenReceived(RadarVerifiedLocationToken token){ Debug.Log($"Verified location token updated: {token}");}Error handling#
The Radar SDK includes built-in error handling to ensure that errors are logged and troubleshooting is streamlined. Below is an overview of how to manage and handle errors effectively using the SDK.
Setting Up Error Handling#
The SDK initializes a centralized error management system to capture and log errors globally. The RadarErrorHandler class is responsible for setting up error callbacks and routing error messages to the LogManager for visual logging.
Steps to Enable Error Handling#
Initialize Error Handling:
CallRadarErrorHandler.InitializeErrorHandling()during the application's startup to activate global error monitoring.RadarErrorHandler.InitializeErrorHandling();Error Logging:
All errors caught by the SDK will be logged and displayed in theLogManager's UI text box. The log is thread-safe and formatted with color coding:- Red -
LogType.Errorfor critical errors. - Yellow -
LogType.Warningfor warnings. - Orange -
LogType.Attentionfor attention-level messages. - White -
LogType.Logfor standard logs.
- Red -
The LogManager provides visual feedback for debugging.
Use the LogManager.SetLogConsole(true/false) to enable or disable console logging.
Use the ClearConsole method to reset the visual log for clarity.
Common Issues and Solutions#
Refer to the Radar documentation for error-specific troubleshooting, such as:
ERROR_PERMISSIONS: Ensure location permissions are granted.ERROR_NETWORK: Verify internet connectivity.fraud.proxy == true: Ask users to disconnect from VPNs or proxy servers.
See the Fraud Error Handling Documentation for detailed error messages and resolutions.
Example Integration#
Here’s an example of how to log errors using the SDK:
try{ Radar.SetUserId(userId);}catch (Exception ex){ LogManager.Instance.Log($"Unhandled Exception: {ex.Message}", LogType.Error);}Support#
Have questions? We're here to help! Contact us at radar.com/support.